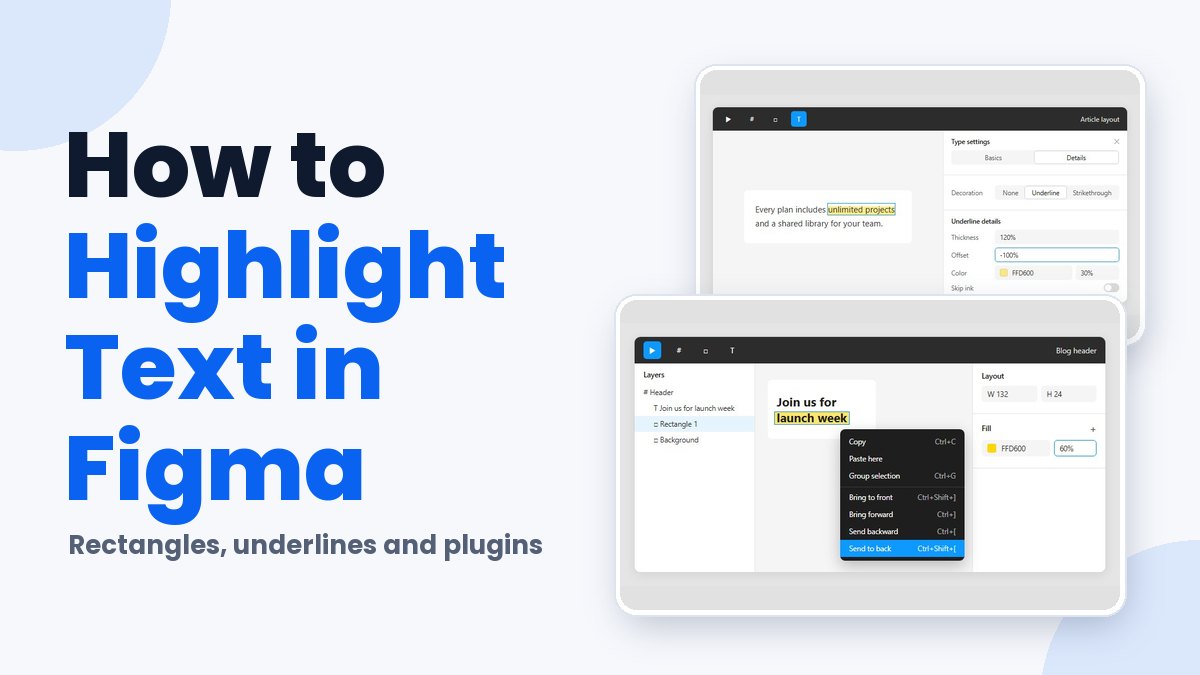
Select a text layer in Figma, change its Fill to yellow, and the letters turn yellow. The space behind them stays exactly as it was. That catches almost everyone the first time, and it explains why there’s no one-click highlight.
If you’re working out how to highlight text in Figma, the Help Center spells out the starting point: a Fill on a text layer recolors only the letters, and a color behind them has to live on a frame (Figma Help Center, checked October 2026). Type settings have no text background option, so everything below is a workaround, and only the underline version is actually a property of the text. Captions and responsive cards are where it hurts, since the band has to survive every edit to the copy.
Does Figma support text highlighting natively?
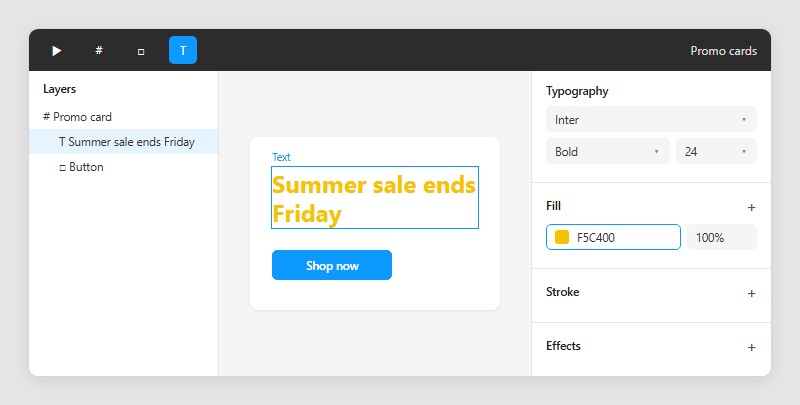
No. Figma’s type settings offer no text background option, and the forum thread requesting one was still collecting new posts in February 2026.
A fill on a text layer recolors the letters and nothing else. Figma’s own guide to text says to place the layer inside a frame and fill the frame to get a color behind the words (Figma Help Center, checked October 2026).
The paper trail on this is public, and it goes back a while.
- May 12, 2023: the Figma Forum thread asking for a highlighter in type settings was opened
- 58 replies in that thread, with new requests still arriving on February 3, 2026 (Figma Forum)
- June 7, 2024: a forum answer says highlighting is unavailable and “on our radar for improvement”
- July 1, 2024: a forum answer points designers to a Community file, “Hacked Auto Layout with Multiline Text Highlighted”
- August 22, 2024: Figma Community Support says the request will be passed to the typography team
The people asking aren’t all after the same thing. Forum posters want it for responsive cards and caption-style backgrounds, plus the odd text comparison view, and in every case the highlight has to survive a resize.
In practice that leaves you with rectangles, auto layout frames, a thick offset underline, or a Community plugin that draws the band for you.
Which text highlighting method fits which job?
For words inside a paragraph, the underline trick is the one to use. Text that keeps changing belongs in an auto layout frame. A rectangle only makes sense on a frame nobody will edit again, and a plugin fits when you need a lot of quick marks and can live with a manual refresh later.
| Method | Follows text edits | Partial words | Setup effort |
|---|---|---|---|
| Rectangle | No, resize by hand | Manual, per rectangle | 6 actions |
| Auto layout frame | Yes, with hug contents | Needs its own layer or frame | 4 actions |
| Underline trick | Yes, tied to the characters | Yes, selected characters | 5 settings |
| Plugin | Rerun or update after edits | Selection-based | 3 clicks |
The rectangle wins on speed. No settings, no fuss, and it suits a static mockup that goes to review once.
It loses the moment the copy changes. The shape is separate from the text, so every edit means resizing it by hand, and one Figma Forum poster describes these workarounds as needing adjustment each time the text or container changes (May 2024).
My rule is to count how many times the text will change after you place the highlight. Once or never, use a rectangle. Two or more, build the frame or the underline version one time and stop adjusting.
Multiline text narrows the field. Rectangles and frames need a separate piece for every line, while the underline trick attaches to the characters themselves.
The plugin looks like the obvious pick and ends up the weakest long-term. It saves clicks, not maintenance. Substrate for text, for example, asks you to click Update after the text changes (Figma Community listing).
How to highlight text with a rectangle
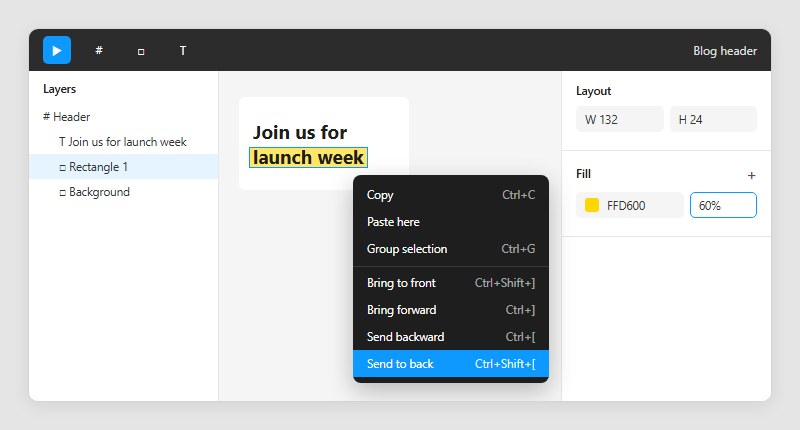
Draw a rectangle, fill it with the highlight color, send it behind the text and group the two layers. Six actions in total.
- Select the text layer, or create one with the Text tool (T).
- Draw a rectangle with the Rectangle tool (R).
- Resize and move it until it covers only the words you want marked.
- Set the Fill to the highlight color, and lower the opacity if the letters need to stay crisp.
- Send the rectangle behind the text: Ctrl + Shift + [ on Windows, Cmd + Option + [ on Mac.
- Select both layers and group them with Ctrl + G (Cmd + G on Mac).
The weak spot is obvious once you’ve done it. The rectangle is its own layer, so rewrapped or edited text leaves it behind. Send to Back also drops it beneath every layer in the frame, background shapes included, so use Send Backward (Ctrl + [ or Cmd + [) when the frame has its own background.
Some tutorials list Ctrl/Cmd + [ as the Send to Back shortcut. That combination moves a layer a single step back. Figma staff name Cmd/Ctrl + [ and Cmd/Ctrl + ] as the send backward and bring forward shortcuts (Figma Forum, October 2025).
Layer-order keys also changed in October 2025. Figma repurposed the arrow-key shortcut for moving layers (Cmd/Ctrl + Alt + Up/Down) to rotate the selection, while Cmd + [ and Cmd + ] stayed for bring forward and send backward (Figma Forum, October 2025). Figma reverted the change on February 20, 2026, so the arrow shortcut moves layers again, and rotation is now an opt-in setting called “Rotate layers with keyboard shortcut” in Accessibility Settings (Figma Forum, February 2026).
Spanish keyboards, among others, need Alt Gr for the bracket characters, which is why the October 2025 change hit those layouts hardest. Thread members suggested picking the layout in Figma’s preferences or mapping custom shortcuts in macOS System Settings, and the right-click menu and the shortcuts Figma ships with remain available.
Highlighting several lines with rectangles
Rectangles can’t follow wrapped text, so each line gets its own. Designilo’s 2025 tutorial splits the sentence into separate text layers and gives every part a rectangle or a nested auto layout frame. You end up grouping each text and rectangle pair, then grouping the whole stack.
Three lines means three shapes to keep aligned. Past that, a frame costs less to maintain.
How to highlight text with auto layout
Wrap the text in an auto layout frame, put the highlight color on the frame’s fill, and let the frame hug its contents. The frame then resizes whenever the text does, which is the whole advantage over a rectangle.
- Select the text layer and press Shift + A. Figma wraps the text in an auto layout frame (Figma Help Center, checked October 2026).
- Add a Fill to the frame, not to the text layer, and choose the highlight color.
- Add padding, which is the space between the frame edge and the text. A small horizontal value gives the marker its overhang.
- Set width and height to Hug contents, or double-click the frame edge, so the fill stops at the text.
If auto layout is new to you, a walkthrough on using auto layout in Figma covers the basics.
Figma’s help article shows why the frame follows edits. A 40px text layer inside a frame with 10px side padding gives a 60px frame, and the frame grows to 70px when the text becomes 50px wide.
Toggle vertical trim in the Basics tab of Type settings so the frame hugs the letters instead of the full line box. Figma’s Help Center describes it as removing the extra space above and below text, and Figma staff pointed to it in May 2023 as the fix for uneven padding around text (Figma Forum). Expect small misses, though. A forum user reported in March 2024 that trimmed text boxes can sit a little above or below the cap height.
Sometimes the fill covers the whole row instead of the words. A fixed-width frame, or any child set to Fill container, stops the frame from hugging on that axis (Figma Help Center). A June 2021 forum thread shows the result, with the color filling the container instead of the text.
Set a corner radius on the frame to soften the marker edges, and see how to round corners in Figma if you want more control.
Highlighting multiline text with auto layout
One frame around wrapped text fills the whole text box, not each line. The workaround is a hugging frame per line.
- Split the copy so each highlighted line is its own text layer inside its own frame (Designilo, 2025)
- Duplicate the community file “Hacked Auto Layout with Multiline Text Highlighted” by Yury Zeliankouski from Figma Community
Splitting layers breaks the live link between line breaks and the copy, so an edit means re-splitting by hand. The community file’s author says such workarounds are complex and error prone (Figma Forum, July 2024).
Highlighting part of a line with the underline trick
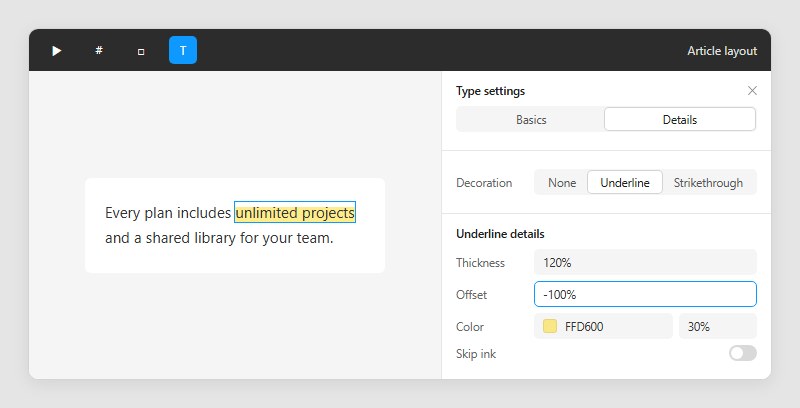
Apply an underline to the selected words, then push its thickness up and its offset negative so it paints a translucent band across them. The recipe a Figma Forum member posted on November 25, 2024 uses these settings:
- Decoration set to Underline
- Thickness at 120%
- Offset at -100%
- Color at 30%
- Skip ink turned off
The controls sit under Underline details in Type settings, and a decoration can cover a whole layer or only the selected text, according to Figma’s Help Center. Plain underlining follows the same path, as the steps to underline text in Figma show.
Figma’s release notes introduced the underline controls (color, style, thickness, offset and skip ink) as part of its October 2024 release. Figma staff said on November 6, 2024 that they were still rolling out to users, and on November 8 that they were live, so the recipe appeared about two and a half weeks after the controls reached users (Figma Forum).
The catch is transparency. The text sits behind the underline, so solid colors are out and the highlighted letters shift slightly in color (Figma Forum, December 2, 2024).
There’s a solid variant if you need one. Set the underline fill to 1% and add a hard shadow at 100% color on the highlighted text, so the shadow forms the band under the letters (Figma Forum, December 2024).
Read together, the forum request and the Help Center describe a split result. The band travels with the selected words, which matches half of what designers asked for, but it still isn’t a true background.
Plugins for text highlighting in Figma
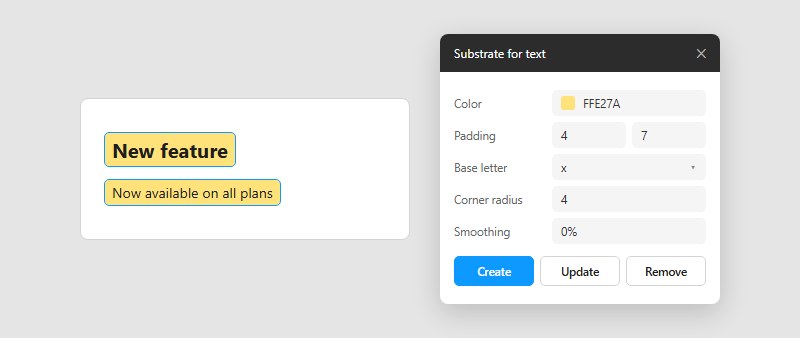
Text Highlighter by BisonTongue and Substrate for text are the Community plugins that draw the band, and both leave you resizing or refreshing by hand.
With Text Highlighter by BisonTongue, you run Format Text to split the copy into one text node per line break, select the lines, then click Highlight Text. The highlight sits on top of the text at lower opacity, and you drag either end, or hold Option on Mac, to resize it.
Substrate for text works the other way around. Select text nodes, click Create, and the plugin builds a colored substrate under each one. Settings cover color, padding, base letter, corner radius and smoothing, and Remove deletes the substrate while keeping the text.
Ctrl + Alt + P repeats the last plugin command, which turns Substrate’s Update into a single keystroke after each edit (Figma Community listing).
An older plugin, also named Text Highlighter, changes the color of text that matches a regular expression, so it recolors letters instead of adding a band (Product Hunt listing, 2020). With two plugins sharing the name, check the author before installing.
BisonTongue’s version splits text at line breaks, so wrapped lines and later reflow sit outside its reach. The team describes Figma’s API as having hard stops for text manipulation and plans a version 2.0 that inserts line breaks from text wrapping (BisonTongue, 2025).
Figma’s own changelog adds a counterpoint. Plugin Update 106 (December 19, 2024) added ranged setters for underline style, offset, thickness, color and skip ink, so a plugin can now apply the underline recipe to selected characters.
None of the plugins above is documented as doing that.
Why text highlights break when copy changes, and how to prevent it
A highlight breaks when its color sits on a layer that does not move with the words. Tie it to the text with a component, a text style or a refresh step, and edits stop costing manual fixes.
For the component route, build the auto layout frame once as a main component. Every instance links back to it, a change to the main component updates all instances in the file, and each instance keeps its own text (Figma Help Center).
For the mechanics, see how to make components in Figma. Yury Zeliankouski’s highlighter v2 component, shared on the Figma Forum on November 8, 2024, needs only 3 layers.
The text style route saves the underline recipe instead. Figma’s style table lists decoration as supported and color or fill as not, and a style can apply to a range of text inside a layer (Figma Help Center). Test that the underline color carries over on an instance before sharing the style with a team.
Build the component when the same highlight repeats across a file. A one-off is faster as a loose frame.
Reusable highlights have limits, and a few of them only show up once a team is involved.
- Components and text styles work on any plan inside one file
- Publishing them to a library needs a paid plan (Figma Help Center)
- Figma cannot push instance changes to a component nested inside another component, so you edit the main component itself
- Viewers cannot highlight text inside a prototype, and a forum answer dated June 7, 2024 suggests comments as the stand-in
Teams on the free tier keep the highlight component inside a single file, and the differences between free and professional plans decide whether it reaches a shared library.
Text Highlighting in Figma FAQ
Which highlight methods allow rounded corners?
The rectangle, the auto layout frame and the Substrate for text plugin. The first two take a corner radius value, and Substrate adds corner radius and smoothing settings.
The underline trick has no radius control.
How do you remove a highlight from text in Figma?
Delete the rectangle, or clear the Fill on the auto layout frame. For the underline trick, turn the underline off in Type settings.
In Substrate for text, the Remove action deletes the substrate and keeps the text.
Can a highlighter font create the effect?
Yes. A June 2021 forum hack uses a font whose glyphs are solid blocks, with a copy of the text in that font stacked under the original.
The font has to be installed on the computer, so teammates need it as well. That makes it a poor fit for shared files.
Is there a keyboard shortcut for highlighting text?
No. Figma has no highlight command, so no dedicated shortcut exists.
The workarounds borrow others: R for the Rectangle tool, Shift + A for auto layout, and Ctrl + G (Cmd + G on Mac) to group.
Standardizing Text Highlighting in Figma Across a Team
Teams should standardize text highlighting in Figma on a component built from an auto layout frame, because the frame follows copy edits and any designer with edit access can update the main component.
The order matters, since rectangles cost a manual repair on every copy edit.
- Replace loose rectangles with hugging frames, then turn the frame into a main component
- Save the underline recipe as a text style for words inside paragraphs
Version the component like any shared element, following best practices for Figma components.
A native background option in Type settings would retire this setup. As of October 27, 2026, none of Figma’s October 2026 release-note entries mention one.

Many of his resources are available on various design marketplaces. Over the years, he's worked with a range of clients and contributed to design publications like Designmodo, WebDesignerDepot, and Speckyboy, Slider Revolution among others.
- How to Highlight Text in Figma the Right Way - November 20, 2026
- Edge Functions Platforms Compared: Telnyx, Cloudflare, Deno - November 19, 2026
- How to Flip an Image in Figma Quickly? - November 18, 2026