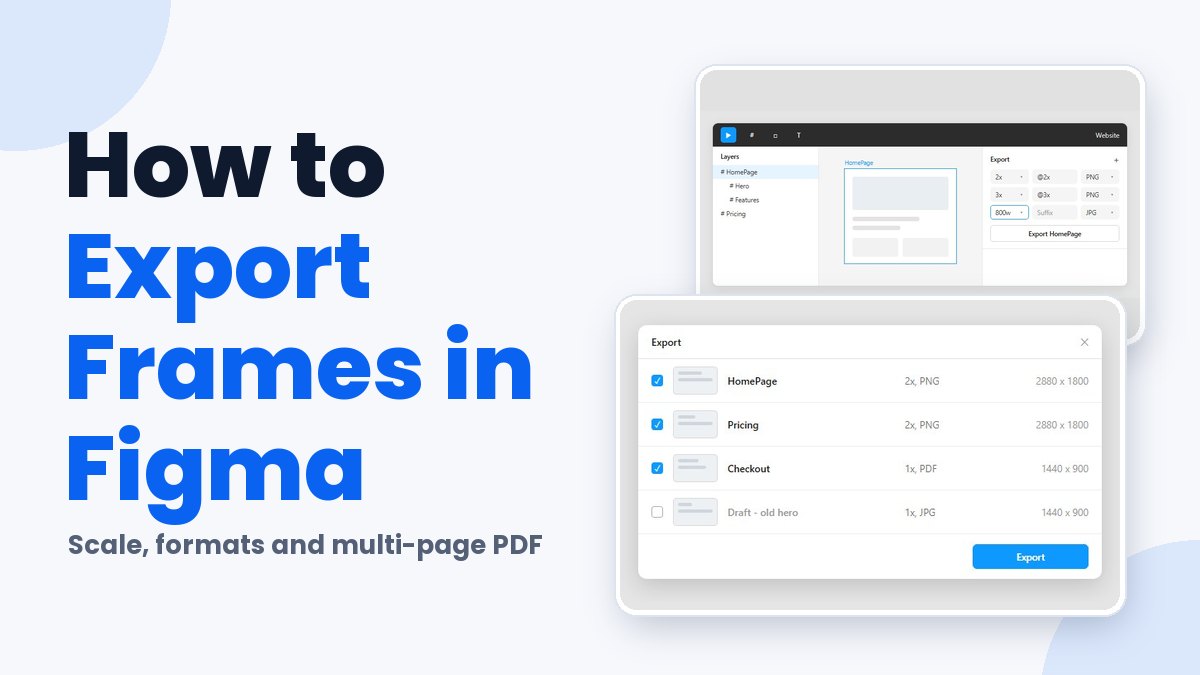
Select the frame, click the plus in the Export section of the right sidebar, pick PNG, JPG, SVG or PDF with a scale, and click Export. That covers a single frame.
A frame can hold more than one export configuration, so a 1x PNG and a 2x PNG come out of the same selection in one go.
PDF behaves differently from the rest. The Export section hands back one PDF per frame, and the Export frames to PDF command in the Main menu is what merges a page’s frames into a single multi-page file, according to Figma community support replies.
How to Export a Frame in Figma
Everything else in this guide is a variation on one sequence: select the frame, add an export configuration in the right sidebar, set a format and scale, click Export.
- Select the frame on the canvas or in the layers panel. To export the whole page canvas instead, deselect everything.
- Click the plus in the Export section to add an export configuration.
- Set the format, scale and an optional suffix.
- Click Preview to check the result (the button disappears when several objects are selected).
- Click Export.
You can stack as many configurations on one frame as you like. Figma’s export documentation confirms that a single selection can produce a 1x PNG and a 2x PNG in one pass.
Groups, components, sections and individual layers export the same way. Anything meant as a full-screen asset should sit inside a proper frame, and the walkthrough on setting up a frame in Figma covers that part.
Where the Export section sits
With edit access, it’s toward the bottom of the right sidebar. Viewers with only view access find it under the Properties tab instead. Dev Mode puts it in the right sidebar too, but it only shows while an object is selected.
If it’s missing, refresh the page first. Then check whether the file owner restricted copying and sharing, since that setting hides export from viewers.
What happens after you click Export
In the browser, the file lands in whatever download location your browser preferences point to. The desktop app asks you to rename the file and choose a destination.
Have you seen the latest Figma statistics?
Discover comprehensive Figma statistics including revenue growth, market share, user demographics, and funding data.
Check them out →Layer names matter here. A slash-separated name like button/pill/default exports into nested folders called button and pill, and the file itself is named default.
Got a frame with a fill? Untick Show in exports in the Fill section and the fill drops out of the exported file. It’s the quickest way to get a transparent PNG from a frame that has a background color.
Which Export Format Fits the Frame?
PNG suits frames with text or transparency. JPG is for photographic frames where file size matters, SVG for icons and logos, and PDF for slide decks and print mockups.
| Format | Type | Scale options | Best for |
|---|---|---|---|
| PNG | Raster, lossless | Any | Logos, charts, UI with text |
| JPG | Raster, lossy | Any | Photos, web images |
| SVG | Vector, XML-based | 1x only | Icons, logos, illustrations |
| Fixed-layout document | 1x only | Slide decks, print mockups, iOS assets |
PNG
Figma exports PNG as 32-bit RGBA, per its format guide as of October 2026, so every PNG carries an alpha channel.
A PNG without alpha data is not an option.
Lossless compression keeps text readable, and you pay for it in file size, since the same frame as a JPG comes out much smaller. For UI screens, charts and logos, PNG is the safe default.
JPG
JPG files are small because the compression is lossy. There’s no transparency, and the compression softens text. Figma’s own guidance is to switch to PNG or SVG when a frame contains text or transparency.
A JPG of a screen with body copy looks fuzzier than the PNG, and the saving rarely matters for UI work. Keep JPG for photography.
SVG
Logos, icons and illustrations belong here.
Because SVG files store shapes as coordinates instead of pixels, they scale to any size without losing quality. They also work in code, which is why they suit responsive layouts.
Text is exported as glyphs by default, so the text layer can’t be edited afterward. Strokes come out as fills. Background blurs don’t carry over at all, so blur the layer directly if you need the effect.
If you’re weighing SVG against PNG for a specific asset, this breakdown of how SVG and PNG differ goes deeper than the table above.
Figma writes PDF 1.7 files.
The format keeps text, fonts, vector graphics and images in a fixed layout that opens the same way on any system. Figma recommends it for slide decks and for print design mockups. It also works for iOS assets, since Xcode supports PDF.
How Do Export Scale and Suffix Work?
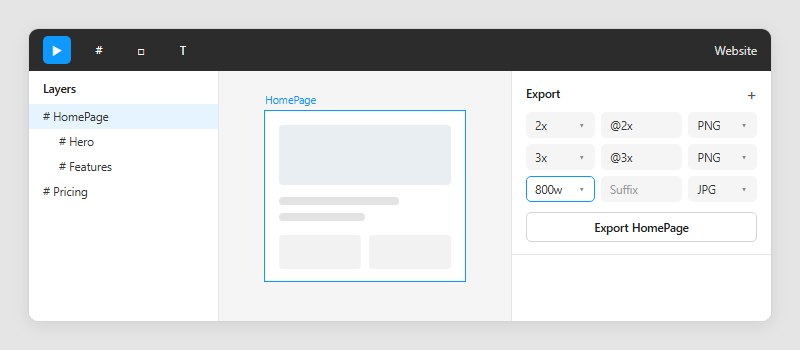
Scale sets the exported size relative to the frame. That can be a multiplier such as 2x, a fixed width such as 800w, or a fixed height such as 600h. Suffix adds text to the file name, so several scales of one frame can sit next to each other in a folder.
Custom scale syntax
The Scale field offers default options and also accepts a typed value. The letter after the number decides what the number means. An x makes it a multiplier, while w and h pin the width or height to a fixed value, so 800w gives you an 800 pixel wide export no matter how big the frame is.
Scale, DPI and retina screens
Images exported from Figma start at 72 DPI, according to Figma’s format guide. A 2x export comes out at 144 DPI and a 3x export at 216 DPI. SVG and PDF only offer 1x.
Since exported images start at 72 DPI, the multiplier simply scales that number. That’s the whole formula.
A 2x export imported back into Figma doesn’t look bigger on the canvas. Figma reads 144 DPI as a high-density asset and halves its visual size.
The documentation lists no separate DPI field. If you need print resolution, it has to come from a larger multiplier or a fixed width.
Choosing a scale for the destination
For high-density screens such as retina displays, export larger than 1x. Teams that pass frames to engineers usually settle the scale list during developer handoff, so the export rows match what the codebase expects.
SVG stays at 1x. Figma’s workaround is to size it in code with the width attribute on the img tag.
Suffix
Figma adds the suffix exactly as typed. Its own example turns a frame named HomePage plus the suffix draft into HomePagedraft.png.
No separator gets inserted, so type it yourself (@2x, _draft). Do that and one frame produces HomePage@2x.png and HomePage@3x.png without touching the layer name.
What Do the Format-Specific Export Settings Change?
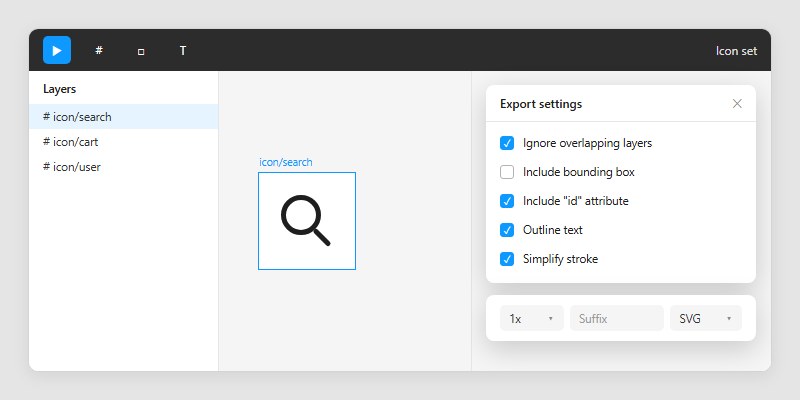
Each format exposes a different subset of options. Based on Figma’s settings matrix, SVG supports all five layer-level options, PNG and JPG support two, and PDF supports none.
Ignore overlapping layers and include bounding box
Ignore overlapping layers is on by default. Only the selected layers land in the export, and anything intersecting them stays out. Switch it off and every layer crossing the selection joins the file.
Include bounding box applies to text layers only. With it on, the export size follows the text box, empty space included, and text outside a smaller box gets trimmed. With it off, Figma sizes the export to the text itself and discards the space between the characters and the box.
SVG-only options
Some settings exist for SVG and nothing else.
Include “id” attribute adds an id to the SVG metadata, based on the layer name, so JavaScript can reach the element or a style sheet can target it. Outline text is on by default when a text layer is selected and converts the text to glyphs. Simplify stroke is also on by default, for vector networks with inside or outside strokes.
Those ids double as selectors when you animate SVG shapes with CSS, so name your layers before exporting if the file is headed for animation.
Simplify stroke exists because SVG only supports center strokes. Turn it off and Figma thickens the stroke and adds a mask. The look is the same, but extra lines end up in the SVG code.
Image quality and resampling
JPG exports at High quality by default and PDF at Medium. Both can be changed in the Export section.
Resampling applies to JPG, PNG and PDF. It decides how Figma colors each pixel when a scaled export has more or fewer pixels than the original.
| Option | Method | Best for |
|---|---|---|
| Detailed (default) | Bicubic sampling | Photos, vector art, gradients, drop shadows |
| Basic | Nearest neighbor | Icons, logos, pixel art |
Color profile
Figma exports with the file’s own color profile unless you override it. The dropdown offers Same as file, sRGB and Display P3.
New files default to sRGB, the long-standing web standard. Display P3 covers 49% more visually distinct colors, according to Figma’s color management documentation, but it isn’t the web default yet.
A May 2026 reply from Figma community support blamed JPEG compression for color shifts in JPG exports from a Display P3 file. The fix it gave was to set both the document profile and the export profile to sRGB.
For web assets, sRGB is the safer export setting.
How to Export Multiple Frames as Separate Files
Select the frames, add one export configuration, and click Export. Figma returns one file per frame, each named after its frame plus any suffix.
Selecting several frames
Shift-click each frame on the canvas, drag a selection box around them, or pick them in the layers panel. Any of those works.
A configuration set while all the frames are selected applies to each of them, so the batch shares one format and scale. That suits a set of same-size screens well.
If one frame needs a 2x PNG and another needs an SVG, give each its own export configuration instead of sharing one.
What comes out the other end
Several selected frames never merge into a single PNG, JPG or SVG. Figma community threads describe exporting several selected layers as producing a zip of separate files.
A 2021 forum reply gives the fix for a combined image: group the layers and export the group.
Bulk export from the Export modal
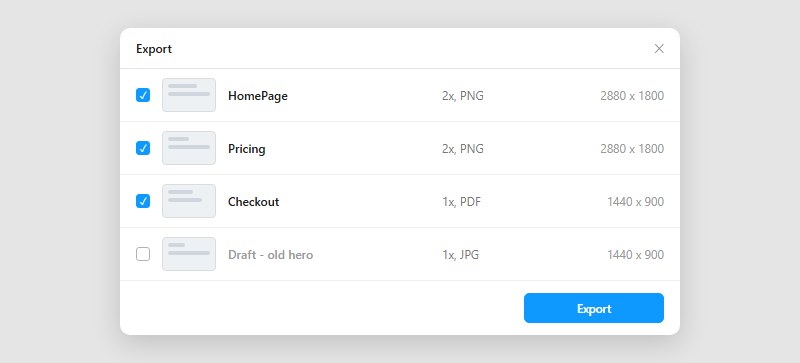
When frames already carry their own export configurations, the Main menu, then File, then Export opens a modal. It lists every selection on the current page that has a configuration applied.
Each row shows the scale, format and dimensions of the asset. Hover over the thumbnail or layer name to see the exported file name, or click the thumbnail to jump to that selection on the canvas. A checkbox on each row lets you leave anything out.
Click Export in the modal and the ticked rows run together. For a file full of screens that each carry their own settings, this is the closest thing to one-click handoff.
How to Export Multiple Frames as One Multi-Page PDF
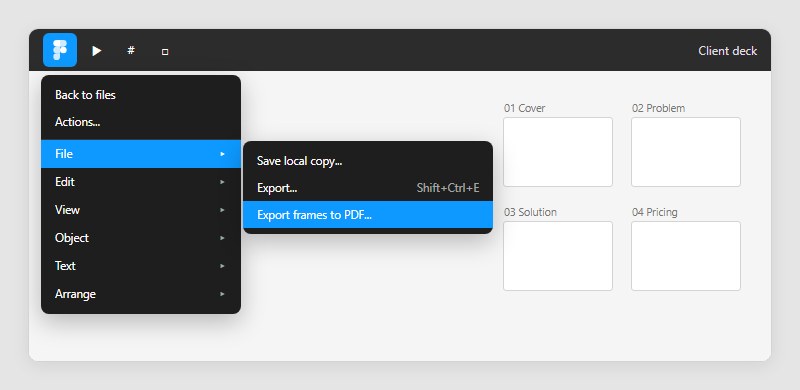
Use the Main menu, then File, then Export frames to PDF. The command writes one multi-page PDF with a page per frame, ordered left to right and then top to bottom by canvas position.
The Export section works differently. Choose PDF there with several frames selected and you get one PDF per frame, as an Echobind guide and several Figma forum threads report.
Where the sources disagree
Some tutorials claim panel export merges the frames. SeaHawk Media’s PDF guide is one of them.
Echobind (2022) says it splits them, and so do forum users as recently as July 2026. Figma community support replies from 2023 to 2025 all give the menu command as the workaround, so the evidence favors the split.
A second disagreement is about scope. Echobind tells readers to select the frames first, while a January 2026 feature request says the command exports everything on the page, selected or not.
Treat the command as whole-page until a test on a copy of your file proves otherwise.
Export frames to PDF, step by step
- Move or copy the frames you want onto one page, with nothing else on it.
- Arrange them in reading order, left to right and then top to bottom.
- Click the Main menu (the Figma logo), then File, then Export frames to PDF.
- Name the file and save it.
A forum thread opened in July 2026 shows why step 3 is worded that way. The original poster found that exporting frames now produced separate PDFs, and replies through August pointed to the Main menu instead of a File menu bar, or to typing the command name into the Actions search.
For PDF output beyond frames, the guide on exporting Figma files to PDF covers the remaining paths.
Fixing page order and stray frames
Pages follow canvas position, not selection order or layer names. One May 2024 report describes scrambled pages despite numbered names and a single-row layout, and the thread never confirms a cause. If your order looks wrong, check the frame positions first.
Unwanted frames in the file? Hide them, or move the wanted frames to an empty page. Both workarounds come from forum replies in 2024 and 2025.
Frames nested inside another frame land on their parent’s page, which is how two frames end up squeezed onto one page. An April 2025 thread shows that moving them to the top level of the page restores one page each.
Panel export versus the menu command
The Export section only exports the frames you select, and each file stays separate, so replacing a single page is easy. The downside is that the pages still need merging afterward, and you rebuild the page order by hand after every export.
The Export frames to PDF command gives you one file in one step, with page order following the canvas layout. It also pulls in any drafts and alternates sitting on the page, and position decides the order, not selection.
Staying with per-frame PDFs means merging afterward. On a Mac, Preview combines them, per Echobind.
When Does Frame Export Fall Short?
Before a client handoff, know that text in PDFs isn’t editable, that two blend modes disappear from PDFs, and that press-ready CMYK output happens outside Figma.
| Limit | Where it bites | Workaround |
|---|---|---|
| PDF text exported as glyphs | Editing copy in the PDF | Edit in Figma, then re-export |
| Plus darker and Plus lighter unsupported | PDF output only | Switch blend mode before export |
| Only sRGB and Display P3 profiles | Print shops asking for CMYK | Convert after export |
| PDF merge command undocumented in the static export article | Behavior shifts between releases | Test on a copy first |
Text and blend modes in PDFs
Figma turns PDF text into glyphs, so nobody can edit it in the final file. Viewers can still select and copy it in a browser or other compatible software.
Plus darker and Plus lighter aren’t supported in PDF exports, according to Figma’s format guide as of October 2026. A frame that depends on either needs a different blend mode before it goes to PDF.
Press-ready color
Figma Design offers two color profiles, sRGB and Display P3, and neither is a press profile. A printer that wants CMYK files needs a conversion outside Figma, and the gap between CMYK and RGB color explains why colors can shift when that happens.
A documentation gap
The help center article on static exports never describes Export frames to PDF.
Its behavior comes from Figma community support replies and user reports, which is why page order, scope and nesting rules can change without a changelog entry. Run any client-facing PDF export on a copy of the file first.
FAQ About Exporting Frames in Figma
How do I export only part of a frame?
Draw a slice with the Slice tool from the Region tools dropdown in the toolbar, then add an export configuration to it like any other object. Only content inside the slice boundaries is exported, and the slice also fixes the padding around the result. Creating one requires edit access.
Is there a keyboard shortcut for export?
Yes. Shift+Command+E on Mac and Shift+Ctrl+E on Windows open the Export modal, according to Figma’s help center.
The modal covers every selection on the current page that already carries an export configuration, not only the frame you have selected.
Does FigJam export sections the same way?
Not for multi-page PDFs. In a January 2024 forum thread, a user wanted one PDF page per section, and Figma community support offered a plugin or merging the downloaded PDFs outside FigJam instead of a native option.
Can a plugin export selected frames to one PDF in a chosen order?
Yes, a free community plugin called Super PDF does this. Figma community support replies describe sorting pages by creation time, name or number, and recommend it in several forum threads. Test it on a copy of the file before client work.
How do I reduce the size of an exported PDF?
Compress the finished file afterward. Echobind’s guide names Preview on macOS and Adobe Acrobat, where the command is labeled something like Reduce File Size or Compress PDF.
How to Make Frame Exports Repeatable
The way to get the same output every time is to save the export configuration on each frame instead of picking settings at the moment you export. The Export modal lists every configured selection on a page, so a saved frame comes out identical on every re-export.
Name the frame first, because the name drives the file name. Then set the format, scale and suffix on each frame, and run one bulk export from the modal.
The catch is upkeep. Every frame holds its own settings, so a switch from 2x to 3x means editing each one.
The Export frames to PDF command rests on community support replies rather than the help center, so verify it again after each Figma update (position checked October 2026). Engineers who pick the assets up afterward work through Dev Mode, which the Figma Dev Mode guide walks through.

Many of his resources are available on various design marketplaces. Over the years, he's worked with a range of clients and contributed to design publications like Designmodo, WebDesignerDepot, and Speckyboy, Slider Revolution among others.
- How to Export Frames in Figma Without Losing Quality - November 12, 2026
- How to Export From Figma [Step-by-Step Guide] - November 10, 2026
- How to Update Figma the Safe Way - November 8, 2026