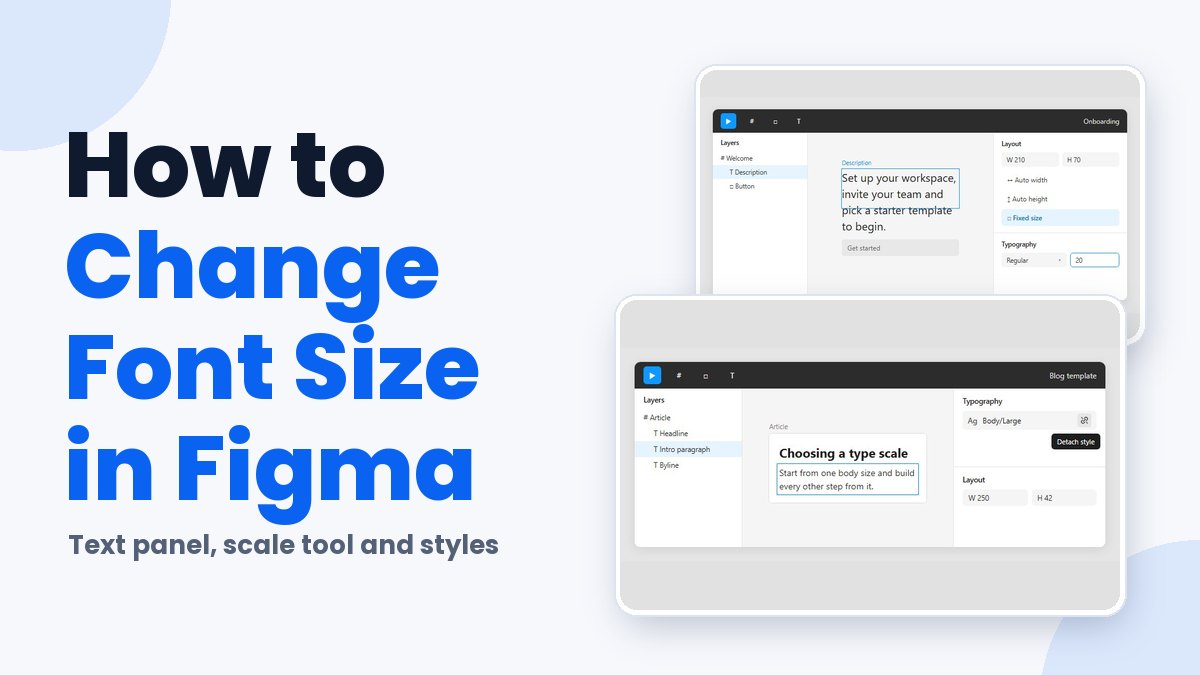
To change font size in Figma, select a text layer and enter a new value in the size field of the Typography section, or pick a preset from its dropdown.
The place people get stuck is text styles. Once a style is applied, Figma swaps the individual size field for the style name, so the size has to be edited inside the style, or the style detached.
How to change font size in Figma with the Design panel
Select a text layer, open the Typography section in the right sidebar, then pick a preset from the size dropdown or type your own number and press Enter.
Frames and shapes show no size control at all, since the field only exists for text layers. Figma Community threads are full of people stuck on exactly that.
- Select the text layer on the canvas or in the layers list (press T to create a new one).
- Find the Typography section in the Design panel.
- Click the arrow beside the size field for a preset, or type a custom value.
- Press Enter to apply it.
Figma’s Help Center says the dropdown holds a fixed list of default sizes. Anything else gets typed in, which is faster anyway once you work from a type scale.
Change the size of part of a text layer
Double-click the layer to enter edit mode, drag across the characters, then change the size field. Only the selected characters change, and the field reads Mixed afterward because the layer now holds more than one size.
Mixed sizes inside one layer make later edits fiddly. When the sizes carry meaning (a price and its currency, say), separate layers age better.
Change several text layers at once
Select every layer with Shift-click in the layers list or a drag box, then enter one number and all of them take it. If the layers started at different sizes, the field shows Mixed until you type.
One catch. Pressing Enter with several text layers selected starts Multi-edit text, which changes the words and not the size (Figma Help Center). Click into the size field first.
Editing the content itself is covered in a separate walkthrough on editing text layers in Figma.
Which keyboard shortcuts increase and decrease font size?
Hold Shift + Command on Mac or Ctrl + Shift on Windows, then press the > or < key.
Which key raises the size depends on who you ask, as of October 2026. Figma’s Help Center text properties article says < increases the size and > decreases it. Shortcut references from Builder.io, Banani and Linuru say the opposite, with > increasing and < decreasing. Layerpath names the period key for increase and the comma key for decrease, which sit under > and < on a US keyboard.
Press the shortcut once on a spare text layer and watch the number in the size field. That settles it for your keyboard.
Non-US layouts add another wrinkle. Figma’s Help Center keeps a keyboard layout article because the font size keys move around. Its table lists > as the increase key for some layouts and < for others, and one layout uses entirely different symbols.
Builder.io’s shortcut guide reports a change of 1 unit per press. Shortcuts nudge, they never set an exact value.
For controlled steps, click into the size field and press Up or Down to move by 1, or hold Shift to move by your Big nudge amount, which is 10 by default.
Weight has its own shortcut, and so do line height and letter spacing. A fuller list of Figma keyboard shortcuts is worth bookmarking.
Scale tool: how it changes font size and why sizes turn fractional
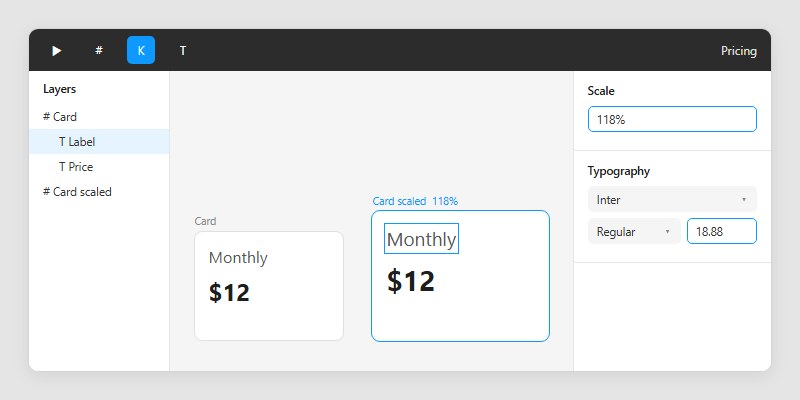
Press K for the scale tool, and any text you drag-resize changes font size along with its box. The regular resize handles only change the box and switch the layer to Fixed size, according to Figma’s Help Center.
It’s handy for resizing a whole frame, text included, in one drag. Aspect ratio stays locked and nested layers ignore their constraints. Strokes and blurs scale too.
The cost is fractional font sizes and subpixel positions, which Figma’s own text dimensions article links to unwanted export artifacts. Locked layers get skipped, and so do layers nested inside a component instance.
Scale a frame to 118% and a 16 px label lands at 18.88 px.
The fix takes about ten seconds. Select the text and type a whole number into the size field.
Type in a design system should never go through this tool. Set sizes with styles instead, and keep scaling for icons and frames, where a walkthrough on scaling objects and frames in Figma covers anchors and multiplier fields.
Why is the font size field missing or locked on a text layer?
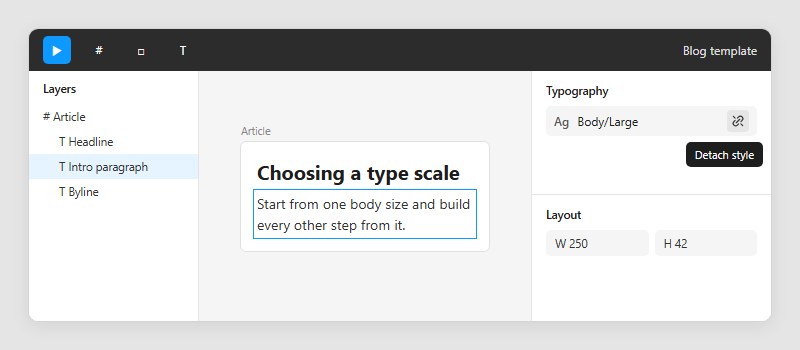
A text style applied to the layer replaces the individual size field with the style’s name, so the control looks missing until you detach the style or edit the style itself.
Text styles store font family, weight, size, line height and letter spacing. They do not store color, alignment or resizing behavior (Figma Help Center).
Most of the time the style is the culprit, but a size change can fail to stick for other reasons too.
- The wrong layer is selected. Frames, groups and shapes have no typography controls, so select the text layer itself.
- A layer with several styles inside it has no single detach button (Figma Community thread, March 2023).
- Editors on different versions of one font see slightly different sizing and spacing, which Figma’s community support ties to conflicting font files (April 2025).
Detach the style from one layer
Hover the style name in the Typography section and click the detach icon. It only appears on hover, which is why so many people miss it (Figma Community, 2024).
The full set of size, weight and spacing fields comes back, and edits now touch that layer alone.
Later changes to the style no longer reach it. Detaching suits a one-off exception and fits badly for a layer that should follow the system.
Edit the text style for every layer
Open the style’s Edit text style window and change the size value there. Every layer using a local style updates with it.
- Select a text layer that uses the style. It does not have to be the style you want to edit.
- Click the style icon in the Typography section.
- Hover the style you want to change and click its edit icon.
- Change the size in the Edit text style window.
- Click anywhere outside the window to save.
Styles published to a team library are edited in the library file. Publish the change as an update, and accept it in the files that use the library.
To create a style from a layer you have already sized correctly, select it, click the style icon in the Typography section, create a new style and name it.
Change the style once instead of fifty layers.
How to set font size with number variables
Create a number variable that holds the size, then choose Apply variable from the font size dropdown on a text layer or inside a text style, so one value drives every piece of text that uses it.
Add the variable to a collection and name it in groups with slashes, a pattern like Font/Size/XXL. On a layer, open the size field’s dropdown and select Apply variable, or click into the size field and press =. For a text style, edit the style, open its size dropdown, then pick Apply variable.
Number variables accept whole numbers or decimals, such as 12.75. Figma Community threads describe a two-decimal limit, so a third decimal place is not supported.
Modes turn that single value into a switch. Create a mode in the variables view and Figma copies the values from the first mode, so only the sizes that differ need editing.
Then set the mode on a layer, frame, section or page. A body size of 16 on desktop and 14 on mobile is the typical use.
Mode counts depend on the plan. According to Figma’s plan comparison page, Starter has no variable modes, Professional allows up to 10 modes per collection, Organization up to 20, and Enterprise is unlimited with extended collections. Check the current plan table, and consider keeping breakpoints and color themes in separate collections so each stays under the cap.
Scoping limits which properties a variable can be applied to. Scope size variables to Font size under font properties, or they show up as options for corner radius, stroke, opacity and effects.
Published Figma Sites pages have had a documented failure here. In reports from May 2025, breakpoint text sizes loaded the mobile values first at desktop widths, and the thread was later labeled fixed. A June 2025 report about typography variables inside text styles on published sites was acknowledged as a bug, and community support said a fix was pushed in July 2025. A March 2026 comment on that thread says the problem persists, so test published pages before relying on it.
For the mechanics beyond typography, a separate guide explains how Figma variables are organized into collections.
Font size units and text resizing behavior
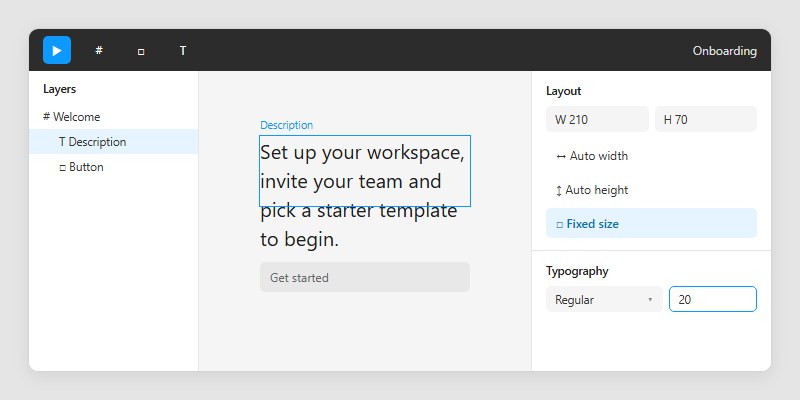
The size field on the canvas uses density-independent pixels, per Figma’s Help Center (as of October 2026).
The unit changes name once the number leaves the canvas.
| Where you read it | Unit | Note |
|---|---|---|
| Canvas size field | Density-independent pixels | The value you type |
| Dev Mode, Typography | CSS pixels | rem option available |
| PDF export | Points (pt) | Print unit |
The Dev Mode and PDF rows come from Figma’s Help Center. Some third-party references label the canvas value as plain pixels, so the unit name varies by source.
For rem, Figma’s Dev Mode documentation lists it as a CSS unit, with 1rem equal to 16px by default. To change the root font size, open Inspect settings in the Code section and choose Set unit scale. Menu names can shift between builds, and the Figma Dev Mode guide covers the rest of that panel.
Text resizing decides what the box does after the size changes. The setting sits in the Layout section of the right sidebar.
- Auto width grows the box sideways and breaks lines only on Enter. A single click creates it.
- Auto height keeps the width where it is and lets the height follow the wrapped text.
- Fixed size leaves both dimensions alone, and click and drag creates it.
Raise the size in a fixed size box and the extra lines can run past the bottom edge and overlap whatever sits below, according to the Help Center.
Tandem’s text block guide calls auto height probably the most common choice in auto layout, and fixed size the least flexible.
Its auto layout example shows why. The component keeps its width and grows taller as text is added, which is the behavior covered in the how-to on using auto layout in Figma.
Choosing a method by scope: layer, file or design system
Match the method to the scope of the change. The Design panel handles one layer, text styles handle a file, and number variables handle a system that needs modes.
| Method | Scope | Stays linked | Main limit |
|---|---|---|---|
| Design panel | One layer or selection | No | Repeat per layer |
| Keyboard shortcut | Current selection | No | Steps, no exact value |
| Scale tool | Frames and groups | No | Fractional sizes |
| Text style | Every layer using it | Yes, to the style | Detaching breaks the link |
| Number variable | Styles and layers, per mode | Yes, to the variable | Mode caps by plan |
A one-off fix takes a typed number and nothing else. The same role repeated across a file belongs in a text style, and different sizes per breakpoint or theme call for number variables inside text styles.
Variables are not the default answer. A file with one breakpoint and one theme gains nothing from a collection, because a text style already carries the size.
Teams building a full library will want the broader Figma design system tutorial, since sizes only stay consistent when styles, variables and components share one source.
Common Questions About Font Size in Figma
How do I change the size of Figma’s own interface text?
Open View, then Interface Scale in the desktop app and choose Make Larger (Option + Shift + Command + = on Mac, Ctrl + Shift + Alt + = on Windows). Browser users adjust the browser zoom instead.
Figma’s Help Center notes that this scales the canvas too, not only the panels.
Does line height change when font size changes?
An Auto or percentage line height follows the new size, and a fixed pixel value stays where it is.
Auto uses the font’s own default line height, which varies between typefaces, so two fonts at the same size can give different results (Figma Help Center).
What font size should body text use in a Figma design?
It depends on the target platform. Apple’s Human Interface Guidelines list a 17 pt default and an 11 pt minimum for iOS and iPadOS, and 13 pt and 10 pt for macOS.
Material Design 3 organizes sizes into 15 type scale styles, five roles in three sizes each, instead of a single default (Android developer documentation).
Can I set a default font size for new text layers?
No file-level setting exists, according to a January 2026 Figma Community feature request.
The request says new layers take their font from the most recently used text style or Figma’s default font. Duplicating a layer that already has the right size keeps that size.
Cleaning Up Inconsistent Font Sizes in a Figma File
Fixing inconsistent font size in Figma starts with text styles, then number variables only where breakpoints need different values.
Styles alone stop working at the point where one role needs two sizes, such as a heading that must shrink on mobile.
Build text styles from layers that are already sized correctly and apply them to every remaining text layer. After that, bind the style sizes to number variables wherever breakpoints or themes differ.
That order matters because variables need a shared container. Bound to loose layers, they recreate the layer-by-layer work.
The cost is local exceptions. Applying a style overwrites them, and a layer with several styles inside takes one replacement style for the whole layer (Figma Community thread, March 2023).
Once sizes follow styles, creating a design system in Figma is the natural next step.

Many of his resources are available on various design marketplaces. Over the years, he's worked with a range of clients and contributed to design publications like Designmodo, WebDesignerDepot, and Speckyboy, Slider Revolution among others.
- How to Change Font Size in Figma for Better Design - November 22, 2026
- How to Highlight Text in Figma the Right Way - November 20, 2026
- How to Write Website Content When Your Client Doesn’t Know What to Say - November 20, 2026