Users abandon pages that leave them guessing. A progress bar fixes that.
Tailwind CSS makes building these indicators fast. No custom stylesheets. No complex configurations. Just utility classes.
This collection of Tailwind progress bar examples covers everything from basic implementations to animated, gradient, and circular variants.
You will learn how to create responsive progress components, add percentage labels, build multi-segment bars, and implement proper accessibility features.
Each example includes copy-ready code that works in any frontend project using Tailwind CSS.
What is a Tailwind Progress Bar
A Tailwind progress bar is a visual indicator built with Tailwind CSS utility classes that displays task completion or loading state as a horizontal fill element.
Two nested div elements form the structure.
The outer container creates the track with fixed dimensions and a muted background color.
The inner element represents the fill portion, using a contrasting color and percentage-based width to show progress.
No custom CSS files needed. Everything happens through class names like bg-blue-500, h-4, w-[75%], and rounded-full.
Tailwind Progress Bar Examples
Progress bar By killgt

Progress Bar with Tailwind

Table With Progress Column
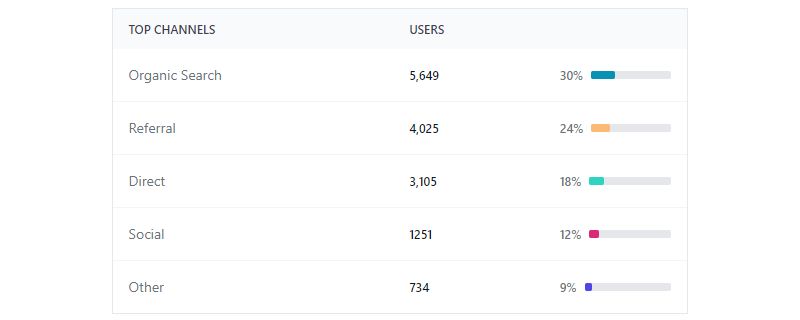
Animated Progress Bar

Tailwind Css Simple Progress Bar Examples

Simple Progress Bar

Tailwind Css React Progress Bar – Horizon Ui

Article Progress Bar With Tailwind Only

Tailwind Progress Bar Shimmer Animation By Andre Prilly Kurniawan

Straight Progress Bar With Bottom Text

Working Reading Progress Bar

Progress Bar -TUK

Vertical Progress Bars

Gradient Progress Bar

Tailwind CSS Progress Bars – Starter Kit

Progress Bar With A Label

Skill Showcase Section For Resume / Porfolio Website

Tailwind CSS Progress – Preline

Slim progress bar with sharp edges

Tailwind CSS Progress Bar – Flowbite

Multi-color progress bar

Tailwind CSS Progress Bar – Tailwind Elements

Progress Bar With Multicolors And Multi Sections

How Does a Tailwind Progress Bar Work
Width manipulation drives the entire component.
The outer div establishes a fixed-width track. The inner div fills a percentage of that track based on whichever width utility class you apply.
Change w-1/4 for 25% completion. Use w-1/2 for halfway. Apply w-3/4 for 75% or w-full when complete.
Dynamic updates require JavaScript to modify the width class or inject inline styles with calculated percentage values.
The browser handles rendering automatically once you swap the class or update the style attribute.
What Are the Components of a Tailwind Progress Bar
Four parts make up a complete progress bar component:
- Outer container – Sets track width, height, background color, border radius
- Inner fill bar – Shows completion percentage with contrasting color
- Text label (optional) – Displays percentage value or status message
- Animation layer (optional) – Adds striped patterns, pulse effects, or transitions
Container and fill bar are required for basic functionality.
Labels and animations depend on your user interface requirements and the type of feedback you want to provide.
What Tailwind CSS Classes Are Used for Progress Bars
Width Classes
w-0 through w-full control fill percentage using Tailwind’s default scale.
Arbitrary values like w-[67%] or w-[33%] allow precise control when you need exact numbers.
Height Classes
h-1 or h-2 creates thin, subtle bars.
h-4 or h-6 work better when you need text labels positioned inside the fill area.
Background Colors
bg-gray-200 or bg-slate-200 typically style the track.
bg-blue-500, bg-green-500, or gradient utilities like bg-gradient-to-r style the fill element.
Border Radius
rounded-full creates pill-shaped progress bars with completely rounded ends.
rounded-lg or rounded-md give softer corners while maintaining a more rectangular shape.
Transition Classes
transition-all combined with duration-300 or duration-500 enables smooth CSS animations when width values change.
How to Create a Basic Tailwind Progress Bar
The basic structure uses two div elements with utility classes:
“ <div class="w-full bg-gray-200 rounded-full h-4"> <div class="bg-blue-600 h-4 rounded-full w-[45%]"></div> </div> `
The outer div sets a full-width track with gray background and rounded corners.
The inner div fills 45% with a blue color. Swap w-[45%] to any value between 0 and 100.
Want smooth transitions? Add transition-all duration-500 to the inner div.
This enables animated width changes when you update progress values through JavaScript DOM manipulation.
How to Create an Animated Tailwind Progress Bar
Add transition-all and duration-500 to the inner fill element for smooth width transitions.
` <div class="w-full bg-gray-200 rounded-full h-4"> <div class="bg-blue-600 h-4 rounded-full transition-all duration-500 ease-out w-[70%]"></div> </div> `
The ease-out class creates natural deceleration. Use ease-in-out for symmetrical acceleration patterns.
Duration options range from duration-75 (75ms) to duration-1000 (1 second).
Combine with CSS keyframes for pulsing or glowing effects that draw attention to active progress states.
How to Create a Tailwind Progress Bar with Percentage Text
Position text inside the fill bar using flexbox utilities:
` <div class="w-full bg-gray-200 rounded-full h-6"> <div class="bg-blue-600 h-6 rounded-full flex items-center justify-end pr-2 w-[65%]"> <span class="text-xs font-medium text-white">65%</span> </div> </div> `
The h-6 height provides enough vertical space for readable text.
Use text-xs or text-sm to keep the percentage display proportional to bar height.
White text (text-white) contrasts against darker fill colors. Swap to text-gray-800 when using lighter backgrounds.
How to Create a Striped Tailwind Progress Bar
Striped patterns require custom CSS or inline background gradients since Tailwind lacks built-in stripe utilities.
` <div class="w-full bg-gray-200 rounded-full h-4"> <div class="h-4 rounded-full w-[60%]" style="background: repeating-linear-gradient( deg, #3b82f6, #3b82f6 10px, #60a5fa 10px, #60a5fa 20px )"> </div> </div> `
The repeating-linear-gradient creates diagonal stripes at 45 degrees.
Adjust pixel values (10px, 20px) to control stripe thickness. Larger values produce wider bands.
Add animate-pulse for subtle movement or create custom micro-interactions with CSS animation.
How to Create a Gradient Tailwind Progress Bar
Tailwind’s gradient utilities work directly on the fill element:
` <div class="w-full bg-gray-200 rounded-full h-4"> <div class="bg-gradient-to-r from-blue-500 via-purple-500 to-pink-500 h-4 rounded-full w-[80%]"></div> </div> `
bg-gradient-to-r flows left to right. Use bg-gradient-to-l for reverse direction.
The via-purple-500 adds a middle color stop. Skip it for simple two-color transitions.
Try a CSS Gradient Generator to find color combinations that match your design system.
How to Create a Multi-Segment Tailwind Progress Bar
Stack multiple colored divs inside a flex container:
` <div class="w-full bg-gray-200 rounded-full h-4 flex overflow-hidden"> <div class="bg-green-500 h-4 w-[30%]"></div> <div class="bg-yellow-500 h-4 w-[25%]"></div> <div class="bg-red-500 h-4 w-[20%]"></div> </div> `
Each segment gets its own width class. Total percentages should not exceed 100%.
The overflow-hidden on the container clips corners cleanly.
Multi-segment bars work well for displaying storage usage, budget breakdowns, or Tailwind charts data in simplified form.
How to Create a Circular Progress Bar with Tailwind
Circular indicators require SVG elements since CSS alone cannot create true circular progress.
` <svg class="w-20 h-20 transform -rotate-90"> <circle cx="40" cy="40" r="36" stroke="#e5e7eb" stroke-width="8" fill="none"></circle> <circle cx="40" cy="40" r="36" stroke="#3b82f6" stroke-width="8" fill="none" stroke-dasharray="226" stroke-dashoffset="56" class="transition-all duration-500"></circle> </svg> `
The stroke-dasharray value equals circle circumference (2 pi radius).
stroke-dashoffset controls visible portion. Lower offset means more fill.
Tailwind classes handle sizing (w-20 h-20), rotation, and transitions. Calculate offset dynamically with JavaScript for real-time updates.
How to Make a Tailwind Progress Bar Responsive
Use responsive design prefixes to adjust height and styling across breakpoints:
` <div class="w-full bg-gray-200 rounded-full h-2 md:h-4 lg:h-6"> <div class="bg-blue-600 rounded-full h-2 md:h-4 lg:h-6 w-[50%]"></div> </div> `
Smaller heights (h-2) on mobile conserve vertical space.
Larger heights on desktop (lg:h-6) allow room for text labels and better usability.
Width automatically adapts when using w-full on the container element.
How to Add Labels to a Tailwind Progress Bar
Position labels above, below, or beside the bar using Tailwind’s spacing and flex utilities:
` <div class="w-full"> <div class="flex justify-between mb-1"> <span class="text-sm font-medium text-gray-700">Upload Progress</span> <span class="text-sm font-medium text-gray-700">75%</span> </div> <div class="w-full bg-gray-200 rounded-full h-4"> <div class="bg-blue-600 h-4 rounded-full w-[75%]"></div> </div> </div> `
The justify-between class pushes label and percentage to opposite ends.
mb-1 adds small spacing between text and bar. Good visual hierarchy keeps elements readable.
How to Add Accessibility Features to a Tailwind Progress Bar
Web accessibility requires proper ARIA attributes on progress bar elements:
` <div class="w-full bg-gray-200 rounded-full h-4" role="progressbar" aria-valuenow="75" aria-valuemin="0" aria-valuemax="100" aria-label="File upload progress"> <div class="bg-blue-600 h-4 rounded-full w-[75%]"></div> </div> `
role=”progressbar” tells screen readers the element displays completion status.
aria-valuenow communicates current progress. Update this attribute whenever the visual width changes.
aria-label provides context about what process the bar represents. Essential for users relying on assistive technology.
FAQ on Tailwind Progress Bar Examples
How do I create a simple progress bar in Tailwind CSS?
Nest two div elements. The outer div uses w-full bg-gray-200 rounded-full h-4 for the track. The inner div uses bg-blue-600 h-4 rounded-full plus a width class like w-[50%] to show completion percentage.
Can I animate a Tailwind progress bar?
Yes. Add transition-all duration-500 to the inner fill element. Width changes become smooth transitions. Combine with ease-out or ease-in-out for natural movement. Update width values through JavaScript for real-time progress animation.
How do I show percentage text inside a Tailwind progress bar?
Add a span element inside the fill div. Use flex items-center justify-end pr-2 for positioning. Apply text-xs text-white font-medium for styling. Increase bar height to h-6 so text remains readable.
What is the best height for a Tailwind progress bar?
Use h-2 or h-3 for subtle indicators without text. Use h-4 for standard visibility. Use h-6 or larger when displaying percentage labels inside the bar. Height depends on your user experience requirements.
How do I make a gradient progress bar with Tailwind?
Apply gradient utilities to the fill element: bg-gradient-to-r from-blue-500 via-purple-500 to-pink-500. The via class adds a middle color stop. Skip it for two-color gradients. Direction classes include to-r, to-l, to-t, to-b.
Can I create a circular progress bar using only Tailwind CSS?
Not with Tailwind alone. Circular progress requires SVG in HTML with stroke-dasharray and stroke-dashoffset properties. Tailwind handles sizing, colors, and transitions. Calculate offset values with JavaScript for dynamic updates.
How do I make a Tailwind progress bar responsive?
Use responsive prefixes on height classes: h-2 md:h-4 lg:h-6. Smaller bars on mobile save space. Larger bars on desktop improve visibility. The container with w-full automatically adapts to parent width across all viewport sizes.
What ARIA attributes should I add for accessibility?
Add role=”progressbar”, aria-valuenow, aria-valuemin=”0″, aria-valuemax=”100″, and aria-label to the container. Update aria-valuenow whenever progress changes. Screen readers use these values to communicate status to users.
How do I create a multi-colored progress bar in Tailwind?
Use a flex container with overflow-hidden. Add multiple child divs, each with different background colors and width percentages. Total widths should not exceed 100%. Each segment displays distinct completion status categories.
Does Tailwind CSS have a built-in progress bar component?
No. Tailwind provides utility classes, not pre-built components. Build progress bars by combining width, height, background, and border-radius classes. Component libraries like DaisyUI and Flowbite offer ready-made Tailwind spinner and progress components.
Conclusion
These Tailwind progress bar examples cover every common use case. Basic bars, animated transitions, gradient fills, multi-segment layouts, and circular indicators.
Each component relies on utility classes. No external dependencies. No complex configuration files.
Copy the code snippets directly into your React, Vue.js, or Next.js projects. They work anywhere Tailwind CSS runs.
Accessibility matters. Always include ARIA attributes so screen readers can communicate loading state to all users.
Start with the basic structure. Add visual feedback through colors and animations. Test across different screen sizes.
Progress indicators seem small. But they reduce perceived wait times and keep users engaged. Worth the five minutes to build them right.
Need similar components? Check out CSS progress bar examples or explore Tailwind button styles for your next project.

Many of his resources are available on various design marketplaces. Over the years, he's worked with a range of clients and contributed to design publications like Designmodo, WebDesignerDepot, and Speckyboy, Slider Revolution among others.
- What is Backend in Web Development? - September 13, 2026
- What is Frontend Development? - September 11, 2026
- How to Make a Button in Figma: Design Best Practices - September 10, 2026